How To Add A Product Image To A Shipstation Packing Slip
In this article, I'm going to provide the basic HTML code you need in order to add a product image or picture to your Shipstation packing slip. Oh, I should introduce myself. Hey there! I'm Tom and I've been building shipstation.com custom packing slips for a few years now. I even have an online store where you can easily purchase pre-made designs here. I've built hundreds of custom shipstation packing slips and am happy to help you if you need a custom design.
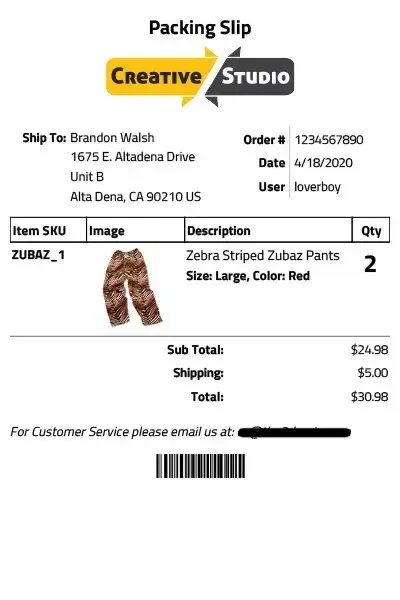
Pictured below is an example 4x6 Shipstation packing slip that shows one product image per line in the order. If you're familiar with Shipstation's customized packing slip layout, there are four key sections that need to contain code in order for the packing slip to display properly.
THE FOUR SECTIONS:
- ORDER HEADER
- ORDER ITEMS HEADER
- ORDER ITEMS
- ORDER FOOTER
Shipstation Packing Slip Product Images
In order to add the product or item image, we're going to focus on both the order items header and order items sections. The order items header contains the column names as shown in the table: Item SKU, Image, Description, and Qty. You can easily alter these titles and add or remove columns as you wish. The key thing is to ensure you have at least one column that says "Image" or "Picture". Whatever terminology you prefer.
Here's a basic example: (Assume <tr> and </tr> are above and below the code shown below)
<th align=left style=width:0.75in class=sku>Item SKU</th>
<th align=left style=width:0.70in>Image</th>
<th align=left>Description</th>
<th align=center style=width:0.35in>Qty</th>
As you can see, one column title is centered while the others are left justified. We also have specific widths set for this packing slip design. It is important to note that the image is in column two from left to right. That equates to line #2 from top to bottom in the code. Next, we'll jump into the order items section so we can add the image!
Know Your Columns & Set The Image Size
Remember that the image was in column two from left to right so we're going to need four lines, one for each column. Each line represents the containers.
Here's an example for the order items: (From left to right)
<tr>
<td class=sku>[Sku]</span></td>
<td><img src="[Image Url]" height="90px"/></td>
<td>[Item Title]<br>[Item Options]</td>
<td align=center>[Quantity]</td>
</tr>
"Line #2 or container two will hold the image. Many people often add the [Image Url] field into this section thinking that it's going to render the product image BUT the field is ONLY THE URL . Because of that, you'll need to add some old school basic HTML code in order for the packing slip to understand that the link is an image. Here it is:
<img src = "[Image Url]">
That's it! Everything else is optional as far as the line of code. In my example you'll notice that I added a height="90px" because I wanted to ensure that the image was no taller than 90 pixels high. You can play with the width or height settings to see what fits your packing slip best.
Overall I hope this quick tip can help anyone who is trying to design their own packing slip in Shipstation and wants to easily add an image of their product. If there is anything I can do to help you with shipstation custom packing slips, please visit my dedicated shipstation custom templates page for more info.
Looking for more help? You can also reference this shipstation help article:
https://help.shipstation.com/hc/en-us/articles/360045435292-How-do-I-add-product-images-to-packing-slips-

Shipstation Templates.com
Disclaimer: Shipstationtemplates.com is not affiliated, sponsored, or endorsed by Shipstation. The Shipstation templates for sale here on this website were created by Ayni Media LLC and are exclusively designed to only work with Shipstation.com.


Ayni Media LLC
2734 Beaver Run Blvd
Suite B #196
Surfside Beach SC 29575